PRINT GUIDELINES
Welcome to the Print Guidelines. In the following pages I hope you will find all the answers you may have for the Print Challenge.
Why should I enter the Challenge?
The Print Challenge is different from the digital competitions as you have to print your photos to get them judged. It is a very different feel to see your photo in your hands rather than just seeing it on the screen. Try it and see it for yourself.
Submitting prints for comments is an excellent learning experience: you will learn from your own submissions as well as from other members.
What are the Print Challenges?
There are two Regular print challenges per season: one in the fall session, and one in the spring session. For each challenge you are allowed a maximum of three prints; they can be any combination of colour (C), monochrome (M) or Creative prints (CR).
There are two Regular print challenges per season: one in the fall session, and one in the spring session. For each challenge you are allowed a maximum of three prints; they can be any combination of colour (C), monochrome (M) or Creative prints (CR).
What is the format to enter my print in competition?
|
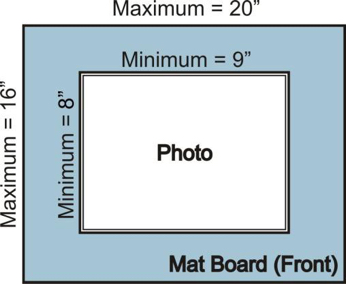
Your prints should be at least 9” on the long side and least 8” on the short side and mounted to a maximum size of 16”x20” (including the mount). Traditional mounting is required which means a matte with a bevel cut, and then placed on top of the print. You will also need to put a board on the backside of the mat board, make sure it’s a rigid material, like backing board or something similar, to keep your print safe. |
NOTE: Larger prints tend to do better than smaller ones, please keep this in mind when deciding the size of print to put in front of the people.
TIP: We see a lot of prints that are cropped by the mat board that do not match the digital version submitted. I recently found out that one could add a 1/16” to 1/8” border around the photo to fix this but; you have to make sure the photo is straight in the opening in the mat or it will look off.
TIP: We see a lot of prints that are cropped by the mat board that do not match the digital version submitted. I recently found out that one could add a 1/16” to 1/8” border around the photo to fix this but; you have to make sure the photo is straight in the opening in the mat or it will look off.
Where do I print my photograph?
There are too many places to list off where you can get your photograph printed. Do your research and make sure they have the experience to get you a quality image to enter into the print competitions. Printing the photograph is just as important and the photograph itself for the Print Competitions.
Printing the photograph is just as important and the photograph itself for the Print Competitions. Some Members print their photos themselves, while others go to more professional locations. Some use more economical locations such as Costco and Jean Coutu, but bear in mind that each location may not have the same experience level.
Member suggestion of a professional printer: Provisia - 4420 ch. Côte de Liesse, Suite 102, Montreal, H4N 2P7 (Tel.: (514) 736-0000)
They have a proof you can use so that you can get the best results; match what you have on your screen and once printed. www.provisia.ca/index_2.html
They have a proof you can use so that you can get the best results; match what you have on your screen and once printed. www.provisia.ca/index_2.html
What colour should my mat board be?
Matting is an integral part of print presentation and should enhance rather than compete with the picture.
Since you are not “framing” the photograph, it’s best to use black or white mat boards for competition.
The black mat board is most commonly used in the competitions.
Matting is an integral part of print presentation and should enhance rather than compete with the picture.
Since you are not “framing” the photograph, it’s best to use black or white mat boards for competition.
The black mat board is most commonly used in the competitions.
Where can I find mat boards? (For reference only, subject to change.)
Gemst Framing: 5254 Paré, Montreal, H4P 1P5 Tel.: (514) 488-5104 pre-cut
Omer des Serres: Multiple locations across the city made to order
Michaels: Multiple locations across the city pre-cut (also does custom framing)
Matshop: http://www.matshop.ca/ can order mat boards in bulk
Note: Many stores that do custom framing will cut mats to order.
Another option: Buy the cutter, Logan 380-1, which is available on the internet to make your custom mats.
How do I mount my Print?
|
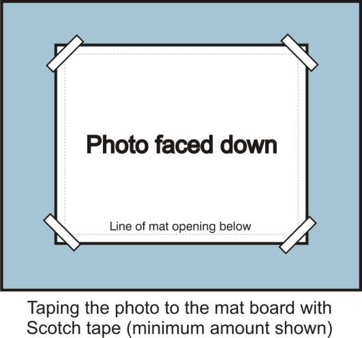
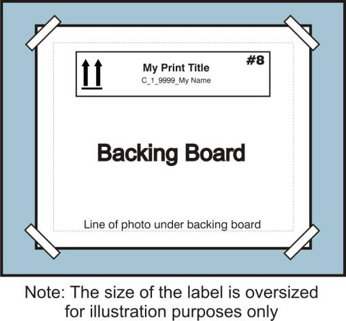
Traditional mounting is required: a mat with a bevel cut and then placed on top of the print. “Flush mounted” prints will not be accepted. Please take care if you are cutting your mat yourself, make sure it’s a clean edge around your photo as this just as important as the print itself The photo is mounted to the back of the mat board, at least tape the corners on the photo; the backing board is then taped securely to the mat board, covering your photo, so that they don’t fall apart when handling the assembled print. You can use double sided tape but this makes it very difficult if you plan to re-use them for the next competition. I use regular scotch tape and tape the photo down and then the board in the back.
|
NOTE: At the end of the year if you would like to resubmit your prints for Print of the Year; they will need to be in their mat as submitted initially so you may need to invest in few more mat boards during the course of the year.
NOTE: If you are using hinged mat boards, please secure the bottom of the mat so it makes it easier for the prints to be handled.
If you have any questions about mounting your prints, please reach out to the chair at [email protected] and we can make sure you get the help that you need.
NOTE: If you are using hinged mat boards, please secure the bottom of the mat so it makes it easier for the prints to be handled.
If you have any questions about mounting your prints, please reach out to the chair at [email protected] and we can make sure you get the help that you need.
|
The backing board can be anything you want. I use Bristol board, other members use other materials. The important part is that they don’t fall off and that they protect your photo. I find it easier to have a smaller backing board so it is easier to tape it to the back of the mat board. On the backing board you can write anything you would like, but make sure you have the label that will be sent to you on it. Just print and cut it out from the email you receive confirming your entries into that week’s competition. Your label MUST be taped to the back of your print, NO EXCEPTIONS.
NOTE: Please pay attention to the arrows to state which way is up for your print as this will determine the positioning of your print in front of the judges. |
- You will need to submit the digital image of each print you plan to submit into competition. Please make sure that your filename matches the format as indicated as above else you will be requested to resubmit the image.
- These images must be sent by email to [email protected] for each challenge. The digital image you submit will be projected on the screen for the audience to see.
- Make sure the image you send is cropped as close as you can to your printed version.
NOTE:
- Images should be submitted with a maximum width of 3840 pixels and a maximum height of 2160 pixels. Not adhering to the guidelines of size and colour space may negatively impact quality when projected.
Please remember:
- Please make sure your prints are properly put together, so they don’t fall apart upon handling.
Before Challenge evening, you will receive an email with a pdf file with your labels. Each print on Challenge evening must have the label received taped to the back as well to ensure the image is shown.
What time do I need to bring my prints for Challenge?
We highly recommend your prints arrive before 7pm so that the volunteers can get them ready for viewing and comments.
We highly recommend your prints arrive before 7pm so that the volunteers can get them ready for viewing and comments.
|
If you have any questions concerning the Print Challenge, please feel free to contact Print at: [email protected]
|
Vertical Divider
| ||||


